Using figures in The Turing Way
Contents
Using figures in The Turing Way
We encourage you to add images to The Turing Way book chapters. This section of the style guide will explain how to use Markedly Structured Text (MyST) format to add them to the book with appropriate alt text and captions.
We are very passionate about ensuring that the creators of the original image files (including you!) are acknowledged appropriately. Please do not use images that are not licenced for reuse.
In this sub-chapter we have used the term figure to refer to an illustration that conveys information in the context of The Turing Way chapters. The term image is used to refer to the file object itself.
Open licence
Please ensure that you attribute the image files fairly and avoid files that are either restricted from reuse or lack reproduction permissions.
The following recommendations will help you to check that you’re using the images according to their licence permissions:
If you are using your own images, please add them to the
figuresfolder. They will then be made available under a Creative Commons Attribution 4.0 International (CC BY 4.0) licence as with the rest of the book.Alternatively, you can source images in the public domain (CC0 licence) or images licensed through appropriate Creative Commons terms. Images that are also available under CC-BY 4.0 permissions are very easily interoperable with the The Turing Way as this is the same licence as the rest of the content for the book.
If an image (for example that you have found on the internet), is not available under an open licence please contact the original author of the image and seek permission to reproduce their image. Make sure to ask them how they would like to be credited in the caption for the figure.
In general, make sure to always cite the image properly as directed by the image owners. “Image from the internet” is not enough.
Image type, file name, size and location
Please upload .jpg or .png files that are under 1MB to allow them to load faster in the online book.
If your file is larger than 1MB, please use a local image editing tools, or online tool like IMG2GO to compress your file.
To name your image file, please use all-lowercase and separate words with hyphens.
Every image file used in this book should be located in the file _figure-list.md in the directory book/website/figures of our GitHub Repository.
If you use a new image file, please add the file in the figures directory, and add details in the _figure-list.md.
MyST syntax to add a figure to a Turing Way chapter
All our chapters are written in Markdown files.
Therefore, using Markdown syntax to include a figure in a Markdown file will work fine, for example, , where the relative path of the image file is provided inside the round brackets ‘()’.
However, this formatting does not allow images to be responsive to screen sizes, making them inaccessible to read on small screens and smartphones. Furthermore, this doesn’t allow authors to resize figures in their chapters or cross reference them somewhere else in the book.
Therefore, our recommendation is to use Markedly Structured Text (MyST) format available in Jupyter Book.
You can resize figures to adjust how they appear in our chapters using the parameters: width and height (takes value in px, for example, 400px) or scale (takes value in percentage, for example, 50%), especially if your original figure is large.
Using the parameter: name, you can reference figures in other chapters in a similar manner as defined in Cross-Referencing Sections and Chapters.
All the components of your figure (figures location, size and name) can be encapsulated in section within a markdown file using the following directive:
```{figure} ../../figures/file-collection.jpg
---
height: 500px
name: file-collection
---
```
This figure can be referred in other files using the {ref} role like:
{ref}`file-collection`
Please note that a height of 500px works very well with The Turing Way book, but this is only a suggestion.
Alternative text
Alternative text or alt text are used for describing the appearance and function of an image on an HTML page. Our example figure can be explained with this sentence: Two people happily browsing files in a drawer of documents.
Adding alternative text to figure is one of the first principles of web accessibility. Screen reader software can read an alt text to better explain the content of the figure to its users.
All the components of your figure (image file location, size, name, alt text and title) can be encapsulated in section within a markdown file using the following directive:
```{figure} ../../figures/file-collection.jpg
---
height: 500px
name: file-collection
alt: Two people happily browsing files in a drawer of documents.
---
_The Turing Way_ project illustration by Scriberia. Used under a CC-BY 4.0 licence. DOI: [10.5281/zenodo.3332807](https://doi.org/10.5281/zenodo.3332807).
```
Another advantage of using alt text is when an image cannot be loaded in a browser, or the link to the image breaks, it is displayed in place of an figure like shown below:

Fig. 104 The Turing Way project illustration by Scriberia. Used under a CC-BY 4.0 licence. DOI: 10.5281/zenodo.3332807.
When all these components are used correctly, a figure included in a file will be rendered in the online book like in this page:
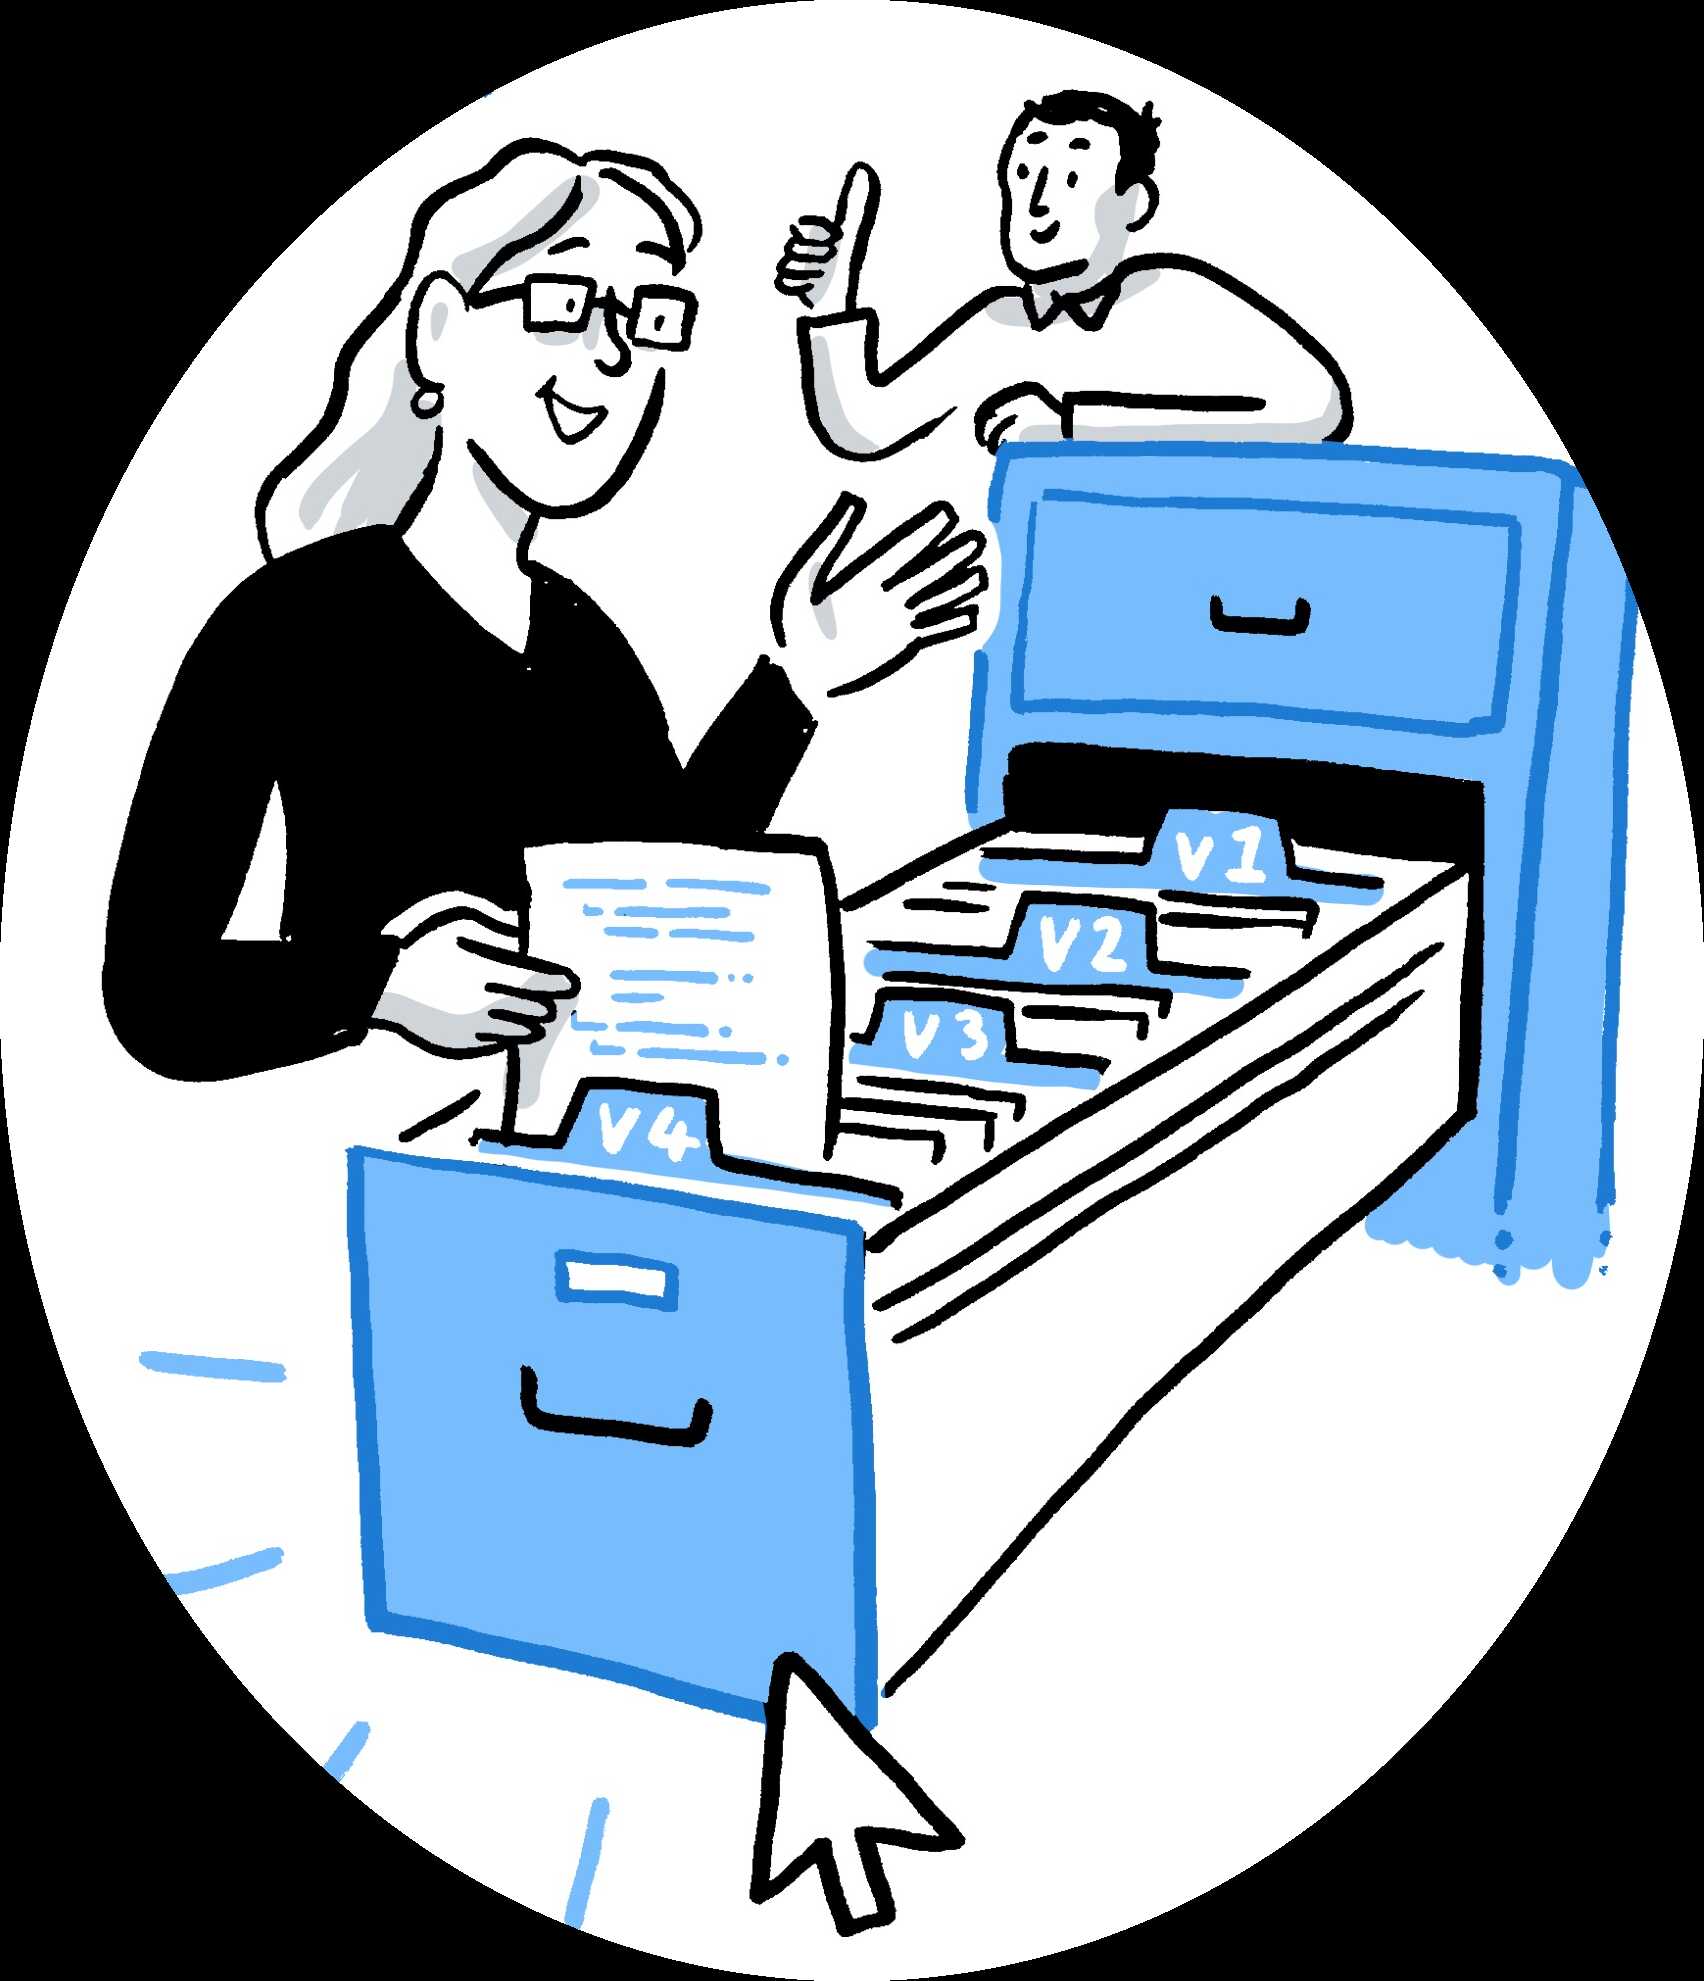
Fig. 105 The Turing Way project illustration by Scriberia. Used under a CC-BY 4.0 licence. DOI: 10.5281/zenodo.3332807.
Caption
Captions appear below the figure. They should be short and concise and include a reference to the source where they are taken from. In particular it is important to describe the licence under which the image is re-used.
For example, a caption might say:
Making your first pull request on GitHub. The Turing Way project illustration by Scriberia. Used under a CC-BY 4.0 licence. DOI: 10.5281/zenodo.3332807.
The syntax for this image is as follows, and the way it appears in the book is below the code snippet.
```{figure} ../../figures/first-pull-request.png
---
height: 400px
name: first-pull-request
alt: A person helping out another person making their first pull request on GitHub
---
Making your first pull request on GitHub.
_The Turing Way_ project illustration by Scriberia. Used under a CC-BY 4.0 licence. DOI: [10.5281/zenodo.3332807](https://doi.org/10.5281/zenodo.3332807).
```
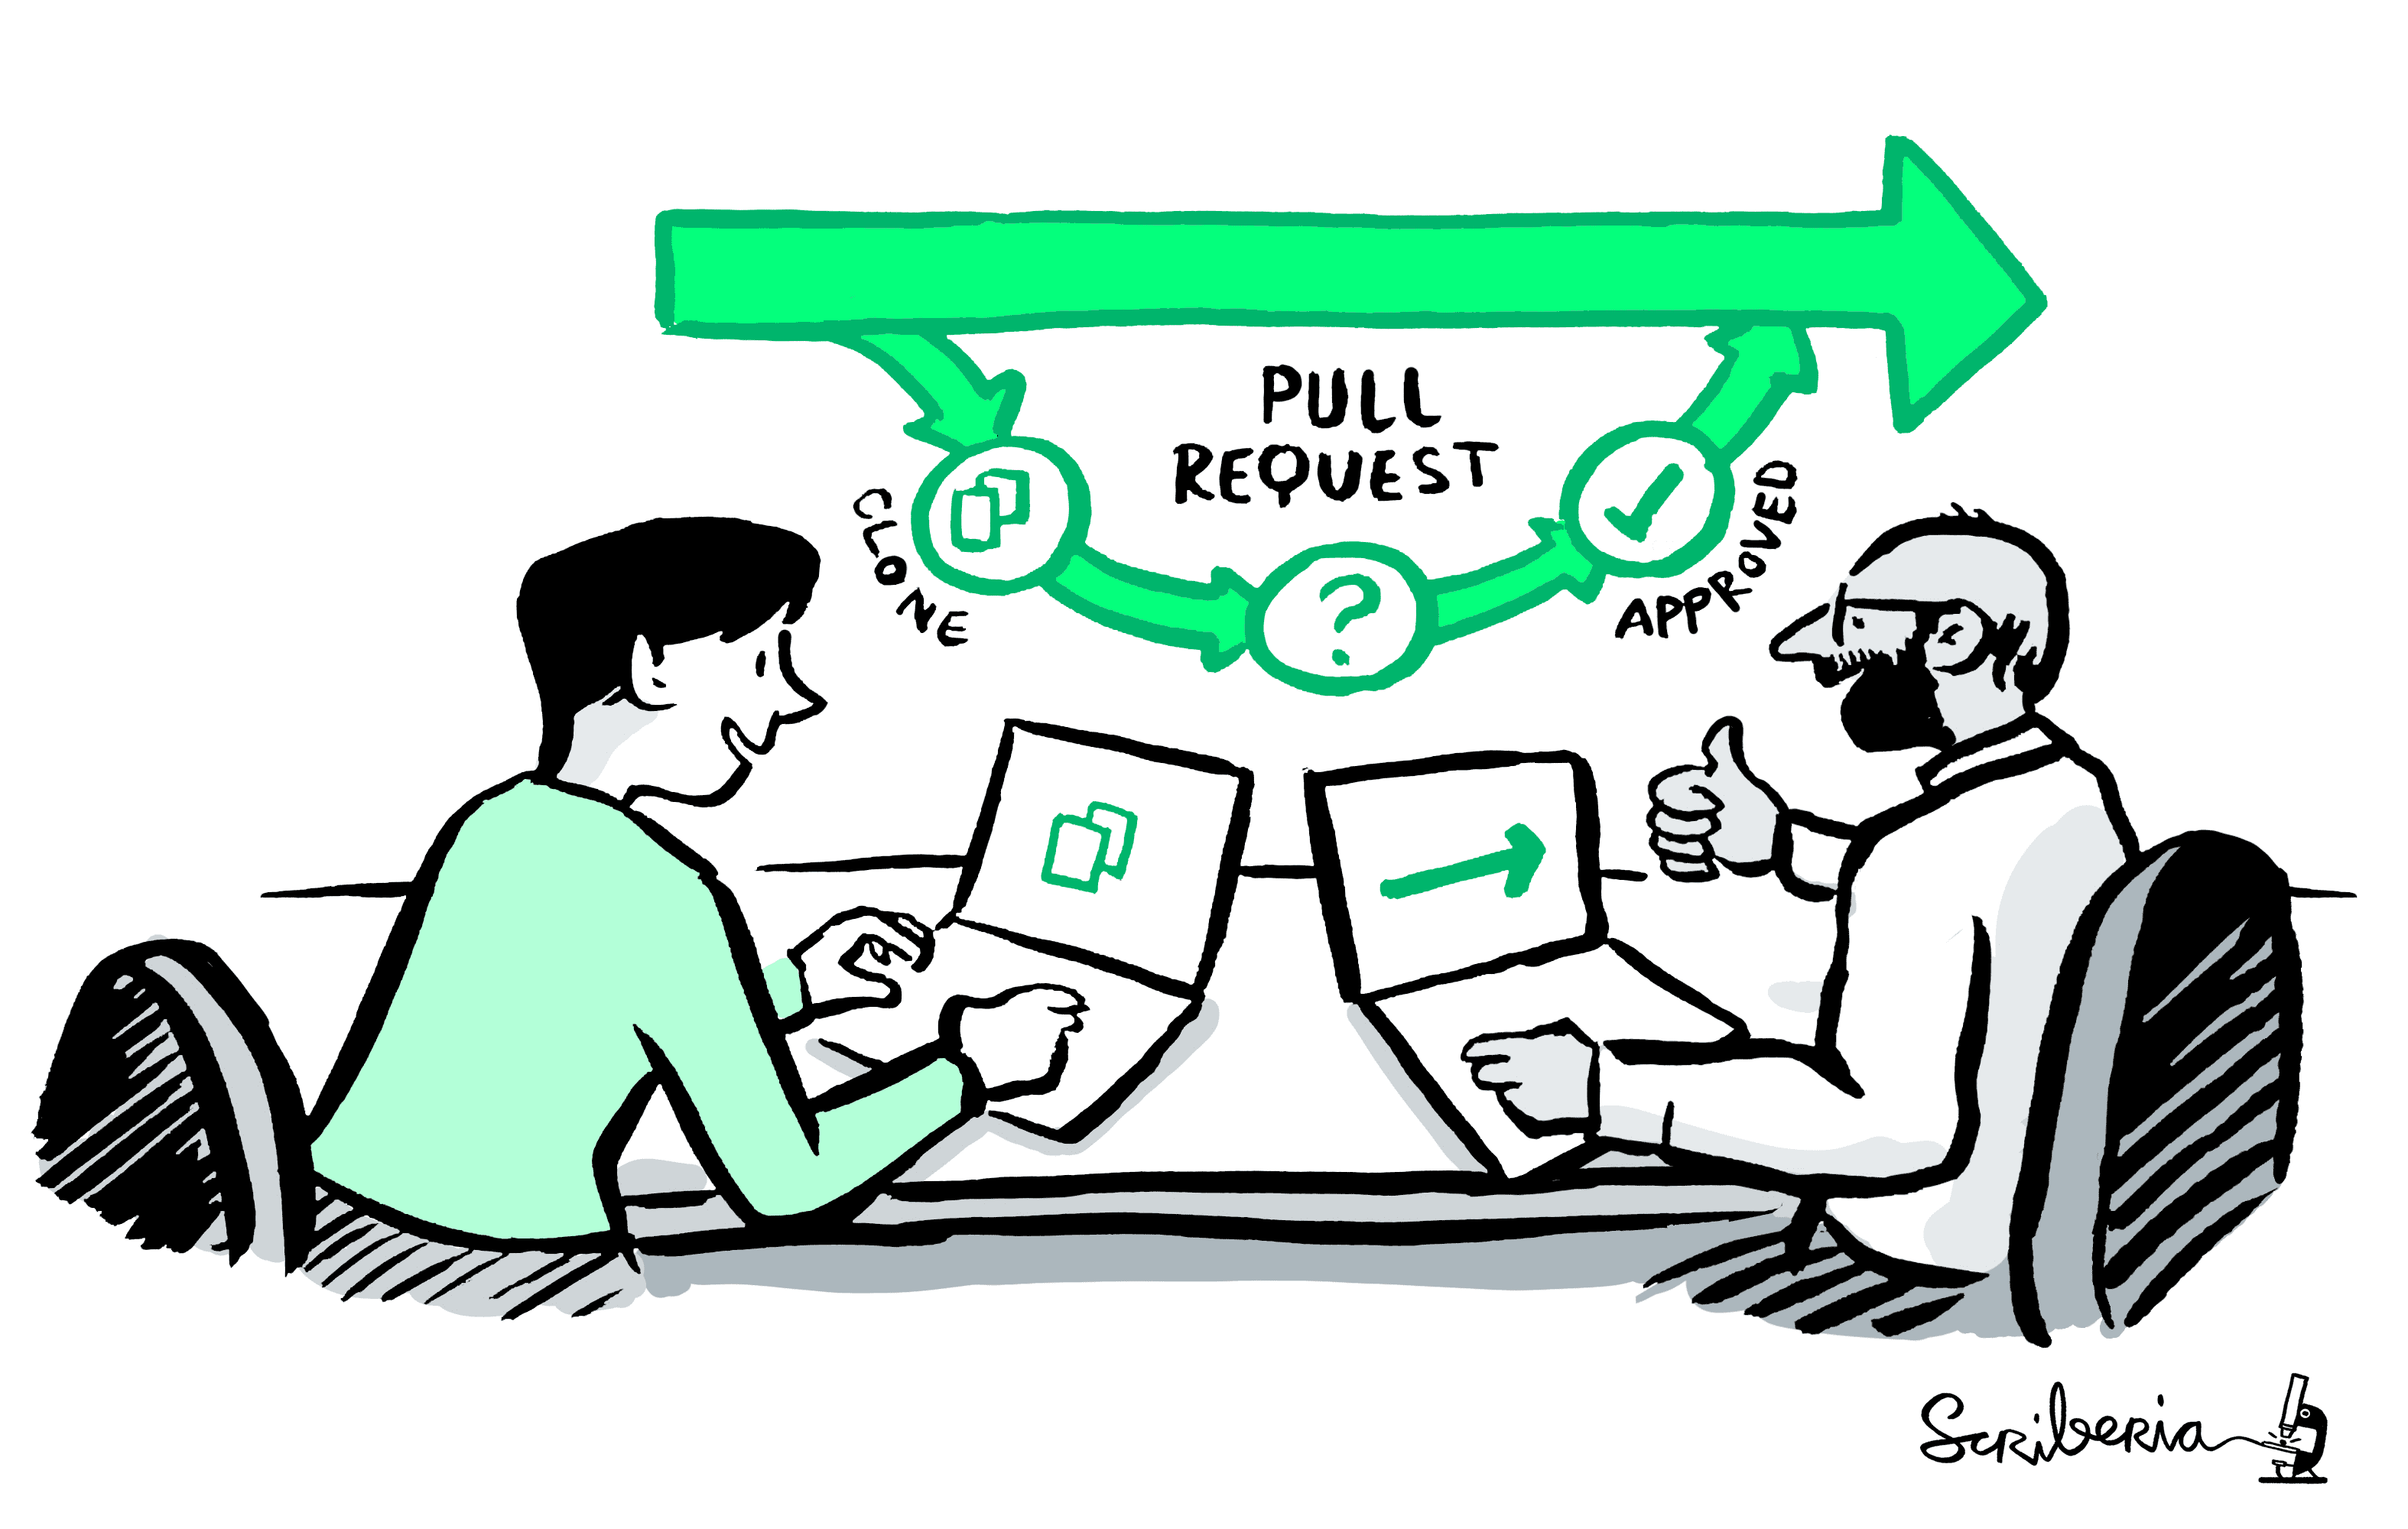
Fig. 106 Making your first pull request on GitHub. The Turing Way project illustration by Scriberia. Used under a CC-BY 4.0 licence. DOI: 10.5281/zenodo.3332807.
Please make sure that the link to the source is the digital object identifier not the Zenodo record.
Also ensure that you have created a link to the source using markdown link formatting: [text](url).
Advanced features and “gotchas”
For more advanced parameters, please see the Jupyter Book Documentation. That page includes information on how to scale and align the figures, and how to add the figures or their captions to the margins of the book.
We’ve noticed a couple of “gotchas” from contributors to The Turing Way and we’ll try to keep this section of the guide up to date for anyone else learning the MyST syntax for figures
Both
:and"have syntactic meaning for Sphinx. That means it is important that you do not use these characters in your alt text.